An essential mixing and sound design technique that every music producer needs to be au fait with, compression is the process of reducing the dynamic range of an audio signal, with the ultimate goal of making the whole thing more sonically consistent and/or raising its overall volume level.

Written by EVO
The hardware/software device/plugin that works this magic is called a compressor, and it does it by automatically lowering the gain of the loudest components of the input signal – the peaks, in other words – so that the quieter components are effectively boosted when the volume level of the whole thing is increased.
Compression can be the difference between, for example, a drum track sounding punchy, driving and upfront, or unfocused, sloppy and anaemic; and with compressors inserted into multiple (or even all) tracks and busses in a project, the end result should be a far more polished, professional sounding mix. Not only that, but compression can also be deployed for purely creative purposes, radically altering the dynamic profile of a part to reshape its transients, say, or crush it down to a solid, in-your-face block of sound.

You already own a great compressor!
All compressors perform the same function, but there are a few architectural variants on the main theme to consider, each differing in the nuances of its sound and response. Indeed, certain ‘VCA’, ‘optical’, ‘FET’ and ‘VariMu’ compressors are sought after for the particular colouration and timing of their preamps, detector circuits and other components – but that’s a discussion for another day. At this stage, all you need to know is that while there are countless free and commercial compressor plugins available, the one included with your DAW will be more than good enough to learn the ropes with. Don’t be in any rush to move on from it until you’ve developed your skills to a sufficient level to warrant exploration of other models.
Compressor controls
Although their presentation and additional parameters differ somewhat from plugin to plugin, the vast majority of compressors centre on the same core set of controls. Here’s how they work:
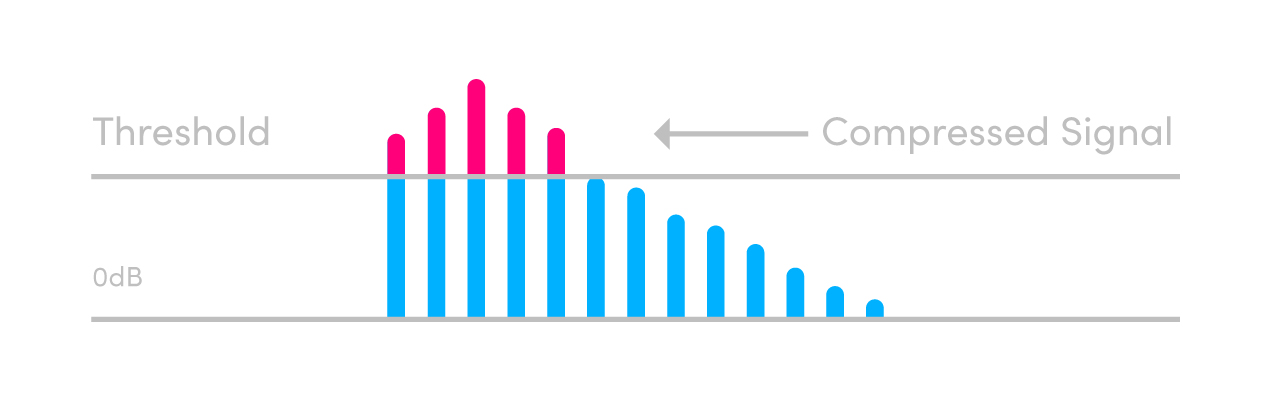
Threshold:
Sets the level (in decibels) above which the input (or an external sidechain – also a topic for another time) signal has to rise for compression (ie, the aforementioned automatic lowering of volume, or gain reduction) to take place. With the Threshold set high, only the loudest parts of the input signal will be compressed; and the further the Threshold is lowered, the ‘deeper’ the compression goes, until, at the very lowest setting, the entire signal is affected.
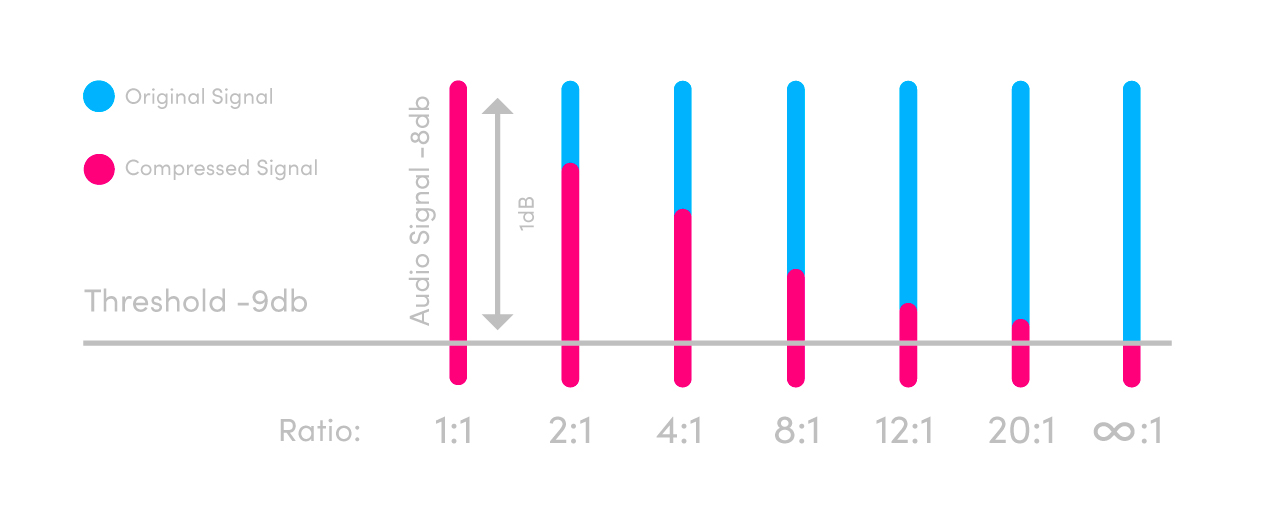
Ratio:
Specifies the level of gain reduction imposed by the compressor, expressed as a ratio – X:1, where X is the amount by which the input signal has to exceed the Threshold to achieve +1dB of gain at the output. So, for example, with a compressor inserted into a guitar track at a Threshold of -20dB and a Ratio of 3:1, for every 3dB the guitar goes over -20dB at the input, the sound heard at the output actually only rises by 1dB. Some compressors will offer Ratios up to 8:1, 10:1 or 20:1, while others will go all the way to infinity:1 – a setting known as ‘limiting’, under which the output level is never allowed to exceed the Threshold, delivering the chunky block of sound we described earlier if the Threshold is low enough.
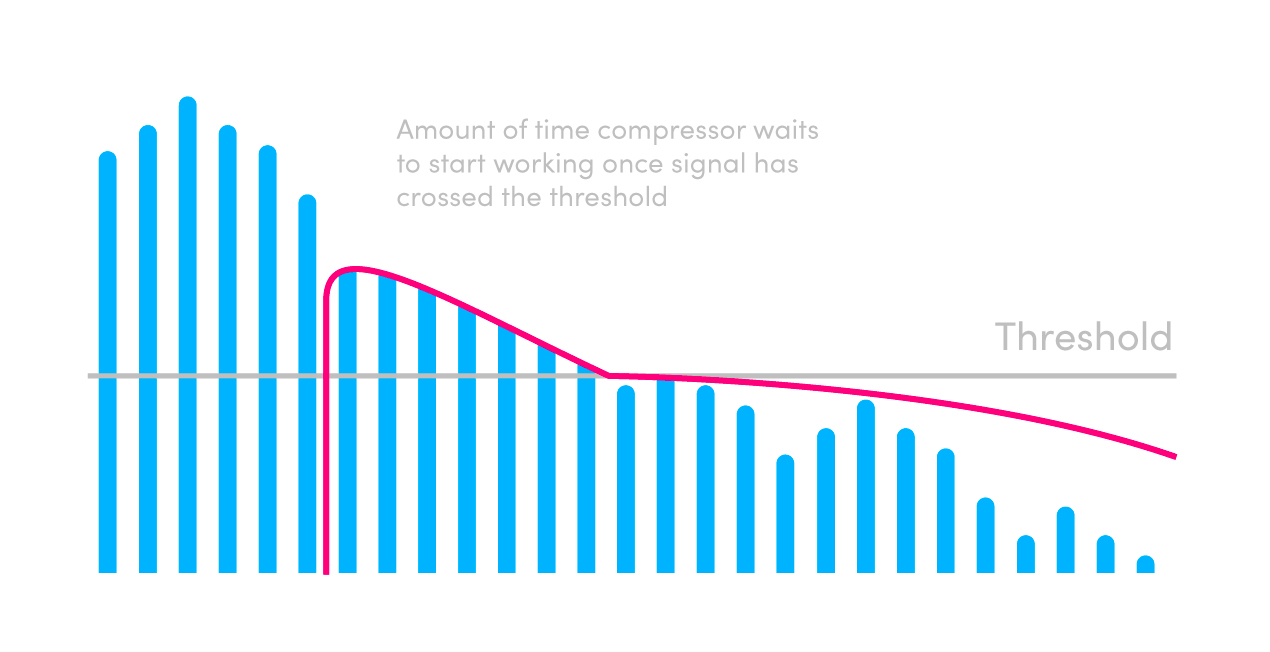
Attack:
Sets the time it takes (in milliseconds) for the gain reduction set by the Ratio control to kick in when the input signal crosses the Threshold. With Attack at the fastest possible setting, full compression happens almost instantly, which may or may not be a good thing, depending on your source material. With drums, for example, immediate full compression will flatten the all-important transients at the start of each hit, to the detriment of the beat. Increasing the Attack allows the transients to poke through before compression begins, preserving the vital energy and punch that they provide.
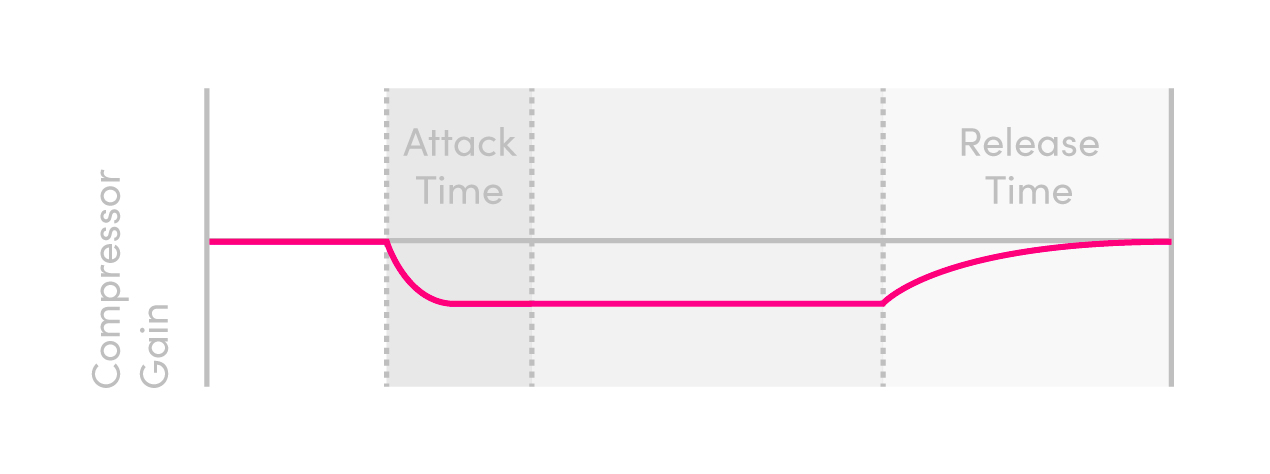
Release:
Establishes the time it takes (in milliseconds and seconds) for the signal to return to its actual volume when the input falls back below the Threshold. The faster the Release, the more aggressive the compression, so keep it medium to slow for a smooth sound; and on drums and other heavily rhythmic material, try to set it so that the compression ‘breathes’ in time with the track. Many compressors feature an ‘Auto’ option that sets the Release to respond differently to transient and non-transient material – this is often a good option for signals that comprise a tricky-to-compress combination of the two.
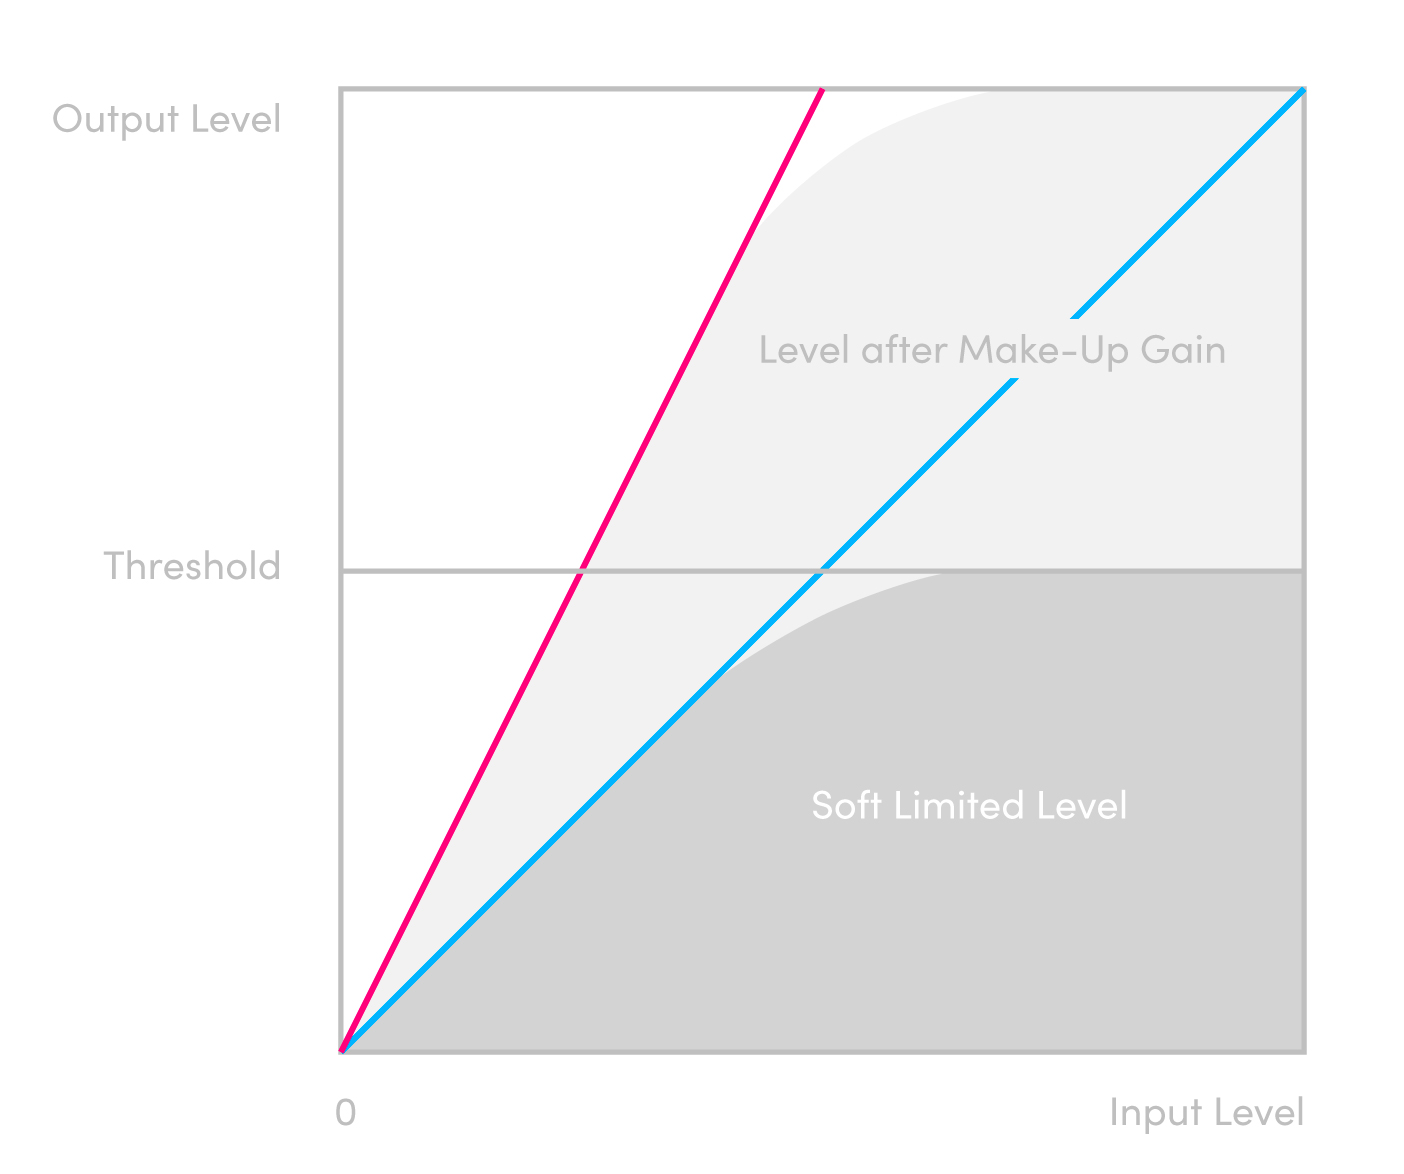
Makeup Gain:
By its very nature, compression reduces the volume of the output signal, so to bring it back up to the level of the input signal and fulfil the stated objective of making the whole part louder, every compressor includes a Makeup Gain control. It simply lets you raise the volume level as required to compensate for the reduction.
Practice makes perfect
For your first forays into compression, start by experimenting with the Threshold and Ratio controls, then, once you’ve got a handle on those, move on to the Attack and Release. Play around with a variety of instrumental material – drums, guitars and vocals will provide a comprehensive enough grounding – and really listen for the effects that your tweaks are having on the sound. Learn to appreciate, too, the differences between ’natural’ (ie, reducing dynamic range without making it obvious that any processing is taking place) and ‘extreme’ (ie, overt, hard-hitting and obvious) compression, so that you can better judge the application of both.
As with all things in music production, the keys to unlocking the power of compression are practice and experimentation, and developing an understanding of when and when not to use it. And although the compressor is a device that takes time to master, the rewards of your efforts and patience will be dramatically better mixes than you ever achieved without it.
Related Articles


Bass guitar is an instrument which is a bit harder to mix than one can imagine. Of course, there is the whole story with the kick and the bass, which has to be taken care of.. But still, many times you may need to add some processing to your bass guitar track in order to make it really pop out in the mix.
Written by EVO
The hardware/software device/plugin that works this magic is called a compressor, and it does it by automatically lowering the gain of the loudest components of the input signal – the peaks, in other words – so that the quieter components are effectively boosted when the volume level of the whole thing is increased.
Compression can be the difference between, for example, a drum track sounding punchy, driving and upfront, or unfocused, sloppy and anaemic; and with compressors inserted into multiple (or even all) tracks and busses in a project, the end result should be a far more polished, professional sounding mix. Not only that, but compression can also be deployed for purely creative purposes, radically altering the dynamic profile of a part to reshape its transients, say, or crush it down to a solid, in-your-face block of sound.
You already own a great compressor!
All compressors perform the same function, but there are a few architectural variants on the main theme to consider, each differing in the nuances of its sound and response. Indeed, certain ‘VCA’, ‘optical’, ‘FET’ and ‘VariMu’ compressors are sought after for the particular colouration and timing of their preamps, detector circuits and other components – but that’s a discussion for another day. At this stage, all you need to know is that while there are countless free and commercial compressor plugins available, the one included with your DAW will be more than good enough to learn the ropes with. Don’t be in any rush to move on from it until you’ve developed your skills to a sufficient level to warrant exploration of other models.
Compressor controls
Although their presentation and additional parameters differ somewhat from plugin to plugin, the vast majority of compressors centre on the same core set of controls. Here’s how they work:
Threshold: Sets the level (in decibels) above which the input (or an external sidechain – also a topic for another time) signal has to rise for compression (ie, the aforementioned automatic lowering of volume, or gain reduction) to take place. With the Threshold set high, only the loudest parts of the input signal will be compressed; and the further the Threshold is lowered, the ‘deeper’ the compression goes, until, at the very lowest setting, the entire signal is affected.
Ratio: Specifies the level of gain reduction imposed by the compressor, expressed as a ratio – X:1, where X is the amount by which the input signal has to exceed the Threshold to achieve +1dB of gain at the output. So, for example, with a compressor inserted into a guitar track at a Threshold of -20dB and a Ratio of 3:1, for every 3dB the guitar goes over -20dB at the input, the sound heard at the output actually only rises by 1dB. Some compressors will offer Ratios up to 8:1, 10:1 or 20:1, while others will go all the way to infinity:1 – a setting known as ‘limiting’, under which the output level is never allowed to exceed the Threshold, delivering the chunky block of sound we described earlier if the Threshold is low enough.
Attack: Sets the time it takes (in milliseconds) for the gain reduction set by the Ratio control to kick in when the input signal crosses the Threshold. With Attack at the fastest possible setting, full compression happens almost instantly, which may or may not be a good thing, depending on your source material. With drums, for example, immediate full compression will flatten the all-important transients at the start of each hit, to the detriment of the beat. Increasing the Attack allows the transients to poke through before compression begins, preserving the vital energy and punch that they provide.
Release: Establishes the time it takes (in milliseconds and seconds) for the signal to return to its actual volume when the input falls back below the Threshold. The faster the Release, the more aggressive the compression, so keep it medium to slow for a smooth sound; and on drums and other heavily rhythmic material, try to set it so that the compression ‘breathes’ in time with the track. Many compressors feature an ‘Auto’ option that sets the Release to respond differently to transient and non-transient material – this is often a good option for signals that comprise a tricky-to-compress combination of the two.
Makeup Gain: By its very nature, compression reduces the volume of the output signal, so to bring it back up to the level of the input signal and fulfil the stated objective of making the whole part louder, every compressor includes a Makeup Gain control. It simply lets you raise the volume level as required to compensate for the reduction.
Practice makes perfect
For your first forays into compression, start by experimenting with the Threshold and Ratio controls, then, once you’ve got a handle on those, move on to the Attack and Release. Play around with a variety of instrumental material – drums, guitars and vocals will provide a comprehensive enough grounding – and really listen for the effects that your tweaks are having on the sound. Learn to appreciate, too, the differences between ’natural’ (ie, reducing dynamic range without making it obvious that any processing is taking place) and ‘extreme’ (ie, overt, hard-hitting and obvious) compression, so that you can better judge the application of both.
As with all things in music production, the keys to unlocking the power of compression are practice and experimentation, and developing an understanding of when and when not to use it. And although the compressor is a device that takes time to master, the rewards of your efforts and patience will be dramatically better mixes than you ever achieved without it.
Related Articles