So you’ve finished up recording your music and you’re wanting to get your music mixed by a professional? Here’s 5 things you need to know before sending it off to them..
As a mix engineer myself in this day and age, a lot of sessions get sent over to me online. As a result, I have had numerous sessions from artists where there have been a few phone calls, emails and social media messages back and forth trying to get to a point where I can start to do the job for the client.
It will come as no surprise to some of you that time is money in this industry. If you can save the professional you have hired to mix your tracks hours of time, it will be more cost effective for you in the long run on the project and ultimately will make the process much smoother for both parties.
If you are sending your tracks to someone to get them mixed, they want to do just that, mixing. The last thing the mixer wants to be doing is wasting hours of time arranging the session in to something that makes sense and working things out in terms of tempos, where things need to go, editing etc.
The following 5 steps will help you save a lot of time, money and headaches when you are ready to send your tracks to a professional mix engineer.
1. Get Your Tracks In Order
In my experience, this step is the first obstacle. Getting your tracks imported into the DAW of choice for your chosen mix engineer. There are several things you can do here to make this go quickly and avoid issues.
Numbering Tracks:
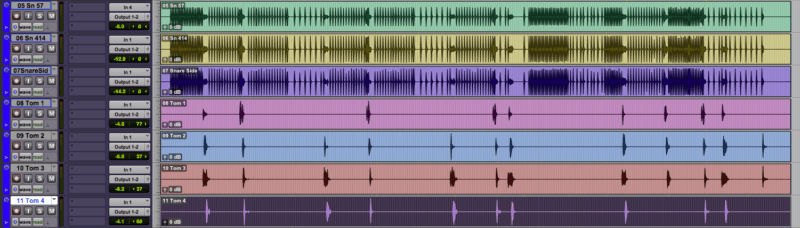
Firstly, go through your session and number your tracks. Most DAWs will import your files in alphabetical order. As a result if you don’t do this, the first job your engineer will be doing is ordering and grouping tracks together into their instruments. This can take quite a while especially if there are a large number of tracks.
By simply applying a number before the name of each track i.e. 01 Kick In, 02 Kick Out, 03 Snare Top etc. the tracks will import into the DAW the engineer is using in the correct order as you have them in your session. From experience if everyone did this, it would have saved me quite literally days of time across my career so far.
Naming Tracks:
Next is making sure your tracks are named correctly. By which I mean that they all have what instrument is on each track. Chances are your engineer wont know who Barry, Steve or Bob is let alone what they play. Make sure they have appropriate naming.
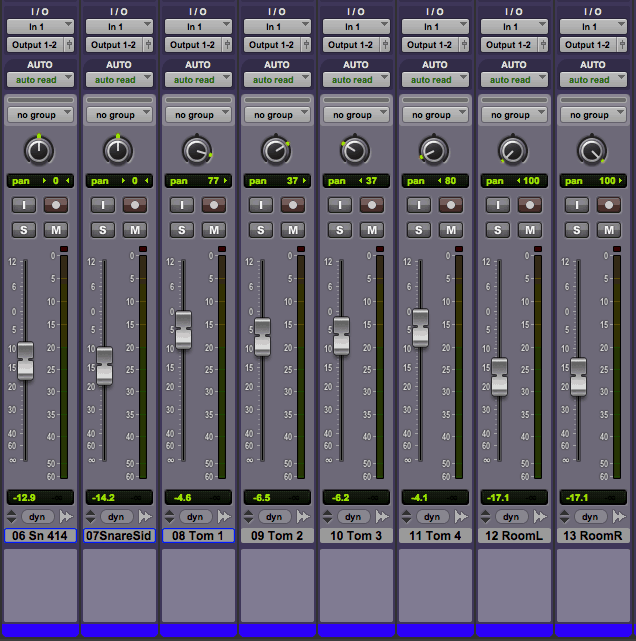
This is how your tracks should look like before sending off to mix.
Naming Consistency:
Also, keep the naming consistent between each song. This is important, as the engineer will want to pull in settings between each song for instruments that remain consistent within the project. If they are all named the same then this process is easy, as the DAW will be importing session settings to each track that has identical naming and numbering.
Getting Organised:
With that in mind, the next step is making a document to include with the song folder that details the numbering system.
Write down the track naming for each song (one text document per song is fine) make a note next to each track mentioning weather the track name/ number is consistent across all songs or unique to the song in the folder.
This way it is clear what tracks are unique and won’t be appearing in other songs. You can also use this document to make notes on tempo, time signature, key and if there are any changes to those throughout the song using the bar/beat number as a reference i.e. a written tempo map. I will get to tempo maps later on (See Step 3).
2. Editing And Session Consolidation
The next hurdle is editing and consolidation ready to export your tracks.
Who’s doing what?
It is a good idea early on in the process of booking a mix engineer to decide who is editing the song (if it is required). I have had some less than ideal conversations with clients who have presumed it was my job to edit the song as well as mix.
It is not always a given that the person you are sending it to is going to do this for you so the best thing to do is simply ask. Ask if editing, pitch correction, comping takes etc. is included or will it be an extra cost. This avoids headaches and gives you an idea of the expectations of your chosen mix engineer.
File Editing/Crossfades:
Further to this, if there are alternate/ several takes of some parts. It is a good idea to either commit to a take or “comped” version of the part or provide each take as a separate file (with appropriate naming by putting take 1, take 2 etc. on the end of each file) if your engineer is editing for you.
If you are editing the files, please make sure there is a cross fade on EVERY edit. Also, do all appropriate fade-in and fade-outs. I have had tracks sent that have clicks, pops and generally unpleasant sounding edits which could have all been solved by simply crossfading between. This will save both parties time with not having to have that conversation.
Include the D.Is!
Next, make sure you are including dry tracks of anything that has had an effect added as well as an effected track if it is essential to a part in the song. This way your mix engineer has ultimate control to either recreate the effect perhaps in a different or better way as well as giving the option to use your effected version.
Also include DI tracks for guitar and bass guitar. This is for a similar reason as it will allow your mix engineer the ability to re-amp if required and use these files to create additional layers or textures within the mix and create more impact/ fix perhaps a less than ideal guitar/ bass sound.
Consolidate your tracks:
Next is making sure each track within the song is consolidated back to the 0 point of the song. This means that you are creating a single file that starts at the very beginning of the session and runs until the track finishes. Every DAW has a way of doing this.
If you are unsure on how to do this within your DAW then pop it into Google or YouTube as I am certain you will find a useful tutorial to allow you to do this. The reason this is essential is so that when the mix engineer is importing your tracks they all line up and all the parts of your song appear in the correct place on the timeline.
Consolidating tracks is essential. It will save your mix engineer a lot of time and most importantly, save you money!
Otherwise it will take a lot of back and forth with the client, hours of time and headaches playing sonic jigsaw getting your song back together!
Once your tracks are consolidated, it is time to export. WAV format is the universal standard. Export the files at the same sample rate and bit depth as your session.
Make a note of what that is on your document you have created for the song which I mentioned earlier as this will again save time and guess work.
Mono vs Stereo:
When exporting, make sure mono sources are exported as mono and stereo as stereo. Keyboards, overheads/ rooms, stereo miced instruments etc. should be the only tracks you export as stereo. The rest should be mono.
DO NOT EXPORT EVERYTHING AS STEREO! This is by far the biggest pet hate of mine as a mixer when you import everything and you have to spend ages getting mono sources e.g. Kick, Snare and Bass back into mono.
3. Export a Tempo Map
The last thing to include in each songs folder is a tempo map. This is essential for a number of processes in mixing but mainly for time dependent effects such as delay, which rely on the tempo/BPM of the song.
Yes some of this can be done manually but it is quicker to just give the engineer a tempo map. This is even more essential if the engineer is editing for you so that they have an appropriate grid to work with in their DAW.
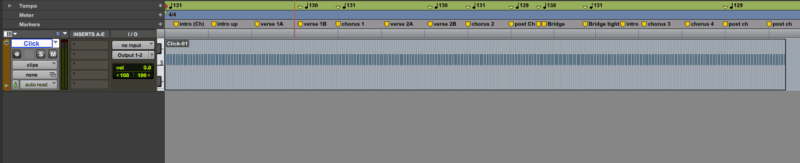
An example of a Tempo Map in Pro Tools. Of course, this can be created in any DAW.
You can do this by exporting a MIDI file that is the length of the song. Most DAWs allow you to do this and this will give the engineer the tempo, meter and any change in those two.
You can also include in this any marker tracks that tell the engineer what sections are which e.g. Intro, Verse and Chorus.
It is a good idea to include any marker locations in the document I mentioned earlier. That way they can be manually entered if the MIDI file does not include them.
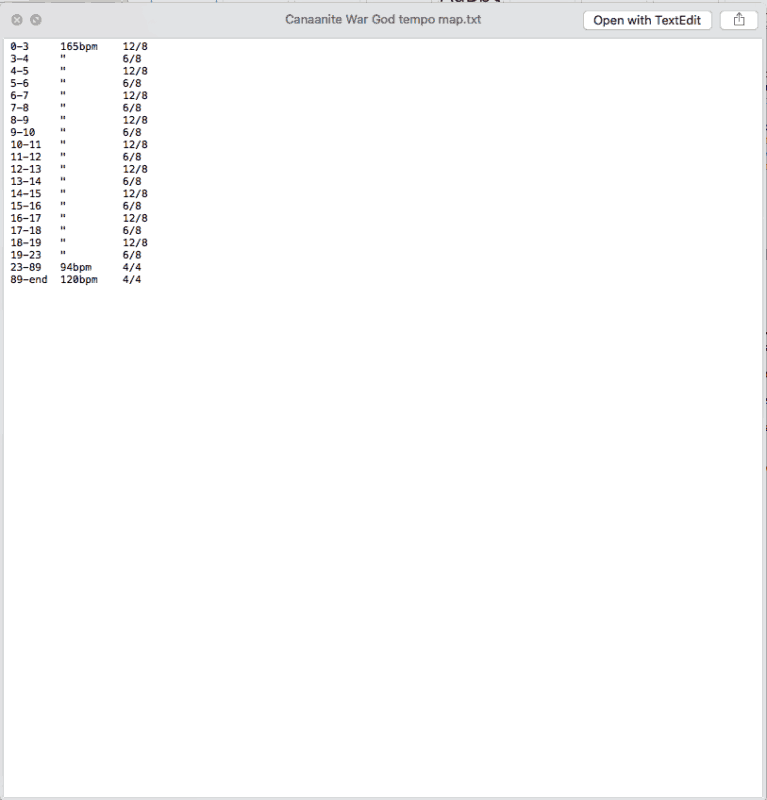
If you’re more comfortable with writing down the tempo map as a text file, that’s fine too!
4. Folder Organisation For Delivery
OK, so now all that is done it’s time to get everything organised.
Create a folder that has the title of the project on it and then within that, create a folder for each song and name it with the correct final title of each song (No working titles at this stage).
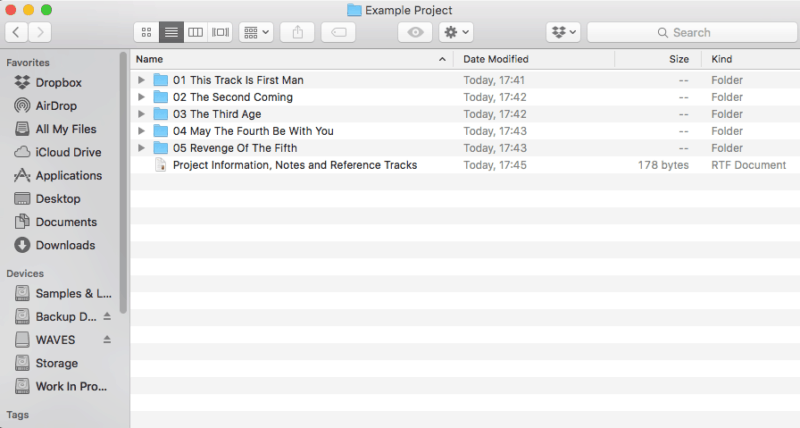
This is how you should be delivering your files to the mix engineer.
Number those folders so they appear in the track order that the project will be in. This allows your engineer to mix in order should they so wish and if the songs are being given to a mastering engineer (or if your mix engineer is mastering as well) it can be delivered back to you in the correct order for the project.
Then export your tracks into each songs folder, add your text document of information and tempo map for each song into each songs folder.
Then perhaps add another document detailing any additional notes for the project as a whole, reference tracks for the engineer to refer to and any other relevant information.
5. Delivery And Mix Revisions
OK so now that is all done, it is time to get it delivered to the engineer. Check before hand how they prefer to receive files.
Getting your stems to the mix engineer:
Is there a file transfer site they prefer (Dropbox or Wetransfer are two that I use) or are you expected to upload it to the engineers FTP server? Are they old school and want it delivered on a hard drive/ thumb drive?
Check beforehand and if you are not sure of how to do anything, ask!
Mix timeframe/setting realistic turnaround times:
Next establish the turnaround time for your mixes. How long will it be before your engineer will be giving you the first version of the mixed project for approval?
The last thing the engineer needs is a band chasing them for the mixes a day or two after getting the tracks for a full-length album. Mixes take time to get right so establish how long it will be ahead of time, this way you have it in writing and know when to expect your mixes back.
Mix revisions:
Also ask how many revisions are included in the cost you have been given. A mix revision is a chance to list any changes you would like made to the mix. The engineer will then perform those changes. Some engineers have a number of times they will do revisions then there will be an additional fee per revision following this.
Some engineers have unlimited revisions. Double-check this in advance. On the subject of mix revisions, check how your engineer wants these notes delivered. The way I do this is get the band to have a meeting and put all changes in to a single e-mail so I can refer to that as I perform the revision.
That way I don’t miss the Facebook message or text I got from one of the band members asking for a change or have to waste time compiling a list myself in order to perform the revisions and ensure everyone is happy with the final product.
Hopefully that has helped you get an idea of the steps required to submit your tracks to a professional for mixing. If you have any questions, please drop a comment below and happy tracking!
6. Loud Clicks/Pops on the Audio Recording
Make sure you close all other apps you don’t need for the recording process. Over-taxing your computer’s processor and RAM cause dropped samples that manifest as random clicks and pops.
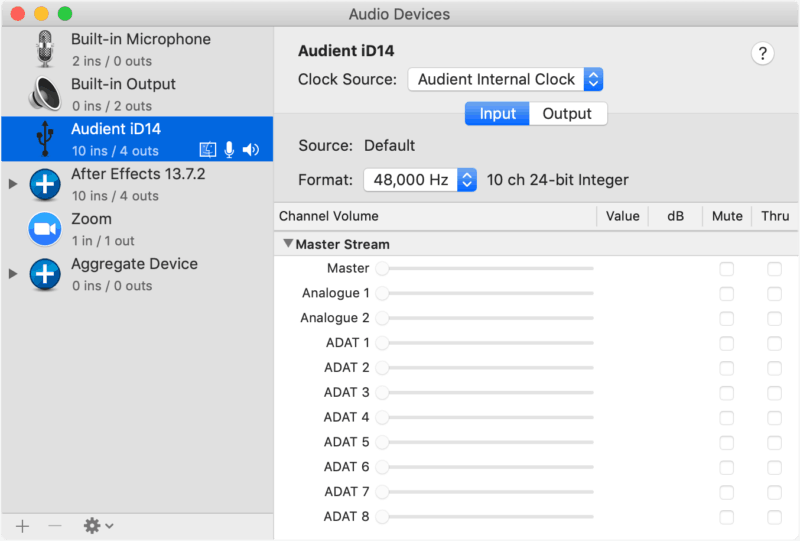
Double check your settings to make sure the right sample rate and clock source are selected for your software, computer, and hardware
You’ll also want to verify that your hardware sample rate and bit depth settings match both your DAW software settings and computer system (Audio MIDI app on macOS, and Sound > Playback device > Properties > Advanced on Windows). If given the option, your audio interface should be set as the “master” for the sample rate or word clock.
Producing good audio recordings requires more than just the ability to push buttons, turn knobs, and click a mouse. Creating podcasts that are of broadcast quality requires a lot of tedious attention to detail at every step of the recording, editing, and mixing process.
What are your biggest problems that you have encountered? I’d love to hear them! Hit me up on Twitter or Instagram at @meonlylouder.
Written by Graham Waller
Related Articles


Here’s 5 things you need to know before sending your track…
As a mix engineer myself in this day and age, a lot of sessions get sent over to me online. As a result, I have had numerous sessions from artists where there have been a few phone calls, emails and social media messages back and forth trying to get to a point where I can start to do the job for the client.
It will come as no surprise to some of you that time is money in this industry. If you can save the professional you have hired to mix your tracks hours of time, it will be more cost effective for you in the long run on the project and ultimately will make the process much smoother for both parties.
If you are sending your tracks to someone to get them mixed, they want to do just that, mixing. The last thing the mixer wants to be doing is wasting hours of time arranging the session in to something that makes sense and working things out in terms of tempos, where things need to go, editing etc.
The following 5 steps will help you save a lot of time, money and headaches when you are ready to send your tracks to a professional mix engineer.
1. Get Your Tracks In Order
In my experience, this step is the first obstacle. Getting your tracks imported into the DAW of choice for your chosen mix engineer. There are several things you can do here to make this go quickly and avoid issues.
Numbering Tracks:
Firstly, go through your session and number your tracks. Most DAWs will import your files in alphabetical order. As a result if you don’t do this, the first job your engineer will be doing is ordering and grouping tracks together into their instruments. This can take quite a while especially if there are a large number of tracks.
By simply applying a number before the name of each track i.e. 01 Kick In, 02 Kick Out, 03 Snare Top etc. the tracks will import into the DAW the engineer is using in the correct order as you have them in your session. From experience if everyone did this, it would have saved me quite literally days of time across my career so far.
Naming Tracks:
Next is making sure your tracks are named correctly. By which I mean that they all have what instrument is on each track. Chances are your engineer wont know who Barry, Steve or Bob is let alone what they play. Make sure they have appropriate naming.
This is how your tracks should look like before sending off to mix.
Naming Consistency:
Also, keep the naming consistent between each song. This is important, as the engineer will want to pull in settings between each song for instruments that remain consistent within the project. If they are all named the same then this process is easy, as the DAW will be importing session settings to each track that has identical naming and numbering.
Getting Organised:
With that in mind, the next step is making a document to include with the song folder that details the numbering system.
Write down the track naming for each song (one text document per song is fine) make a note next to each track mentioning weather the track name/ number is consistent across all songs or unique to the song in the folder.
This way it is clear what tracks are unique and won’t be appearing in other songs. You can also use this document to make notes on tempo, time signature, key and if there are any changes to those throughout the song using the bar/beat number as a reference i.e. a written tempo map. I will get to tempo maps later on (See Step 3).
2. Editing And Session Consolidation
The next hurdle is editing and consolidation ready to export your tracks.
Who’s doing what?
It is a good idea early on in the process of booking a mix engineer to decide who is editing the song (if it is required). I have had some less than ideal conversations with clients who have presumed it was my job to edit the song as well as mix.
It is not always a given that the person you are sending it to is going to do this for you so the best thing to do is simply ask. Ask if editing, pitch correction, comping takes etc. is included or will it be an extra cost. This avoids headaches and gives you an idea of the expectations of your chosen mix engineer.
File Editing/Crossfades:
Further to this, if there are alternate/ several takes of some parts. It is a good idea to either commit to a take or “comped” version of the part or provide each take as a separate file (with appropriate naming by putting take 1, take 2 etc. on the end of each file) if your engineer is editing for you.
If you are editing the files, please make sure there is a cross fade on EVERY edit. Also, do all appropriate fade-in and fade-outs. I have had tracks sent that have clicks, pops and generally unpleasant sounding edits which could have all been solved by simply crossfading between. This will save both parties time with not having to have that conversation.
Include the D.Is!
Next, make sure you are including dry tracks of anything that has had an effect added as well as an effected track if it is essential to a part in the song. This way your mix engineer has ultimate control to either recreate the effect perhaps in a different or better way as well as giving the option to use your effected version.
Also include DI tracks for guitar and bass guitar. This is for a similar reason as it will allow your mix engineer the ability to re-amp if required and use these files to create additional layers or textures within the mix and create more impact/ fix perhaps a less than ideal guitar/ bass sound.
Consolidate your tracks:
Next is making sure each track within the song is consolidated back to the 0 point of the song. This means that you are creating a single file that starts at the very beginning of the session and runs until the track finishes. Every DAW has a way of doing this.
If you are unsure on how to do this within your DAW then pop it into Google or YouTube as I am certain you will find a useful tutorial to allow you to do this. The reason this is essential is so that when the mix engineer is importing your tracks they all line up and all the parts of your song appear in the correct place on the timeline.
Consolidating tracks is essential. It will save your mix engineer a lot of time and most importantly, save you money!
Otherwise it will take a lot of back and forth with the client, hours of time and headaches playing sonic jigsaw getting your song back together!
Once your tracks are consolidated, it is time to export. WAV format is the universal standard. Export the files at the same sample rate and bit depth as your session.
Make a note of what that is on your document you have created for the song which I mentioned earlier as this will again save time and guess work.
Mono vs Stereo:
When exporting, make sure mono sources are exported as mono and stereo as stereo. Keyboards, overheads/ rooms, stereo miced instruments etc. should be the only tracks you export as stereo. The rest should be mono.
DO NOT EXPORT EVERYTHING AS STEREO! This is by far the biggest pet hate of mine as a mixer when you import everything and you have to spend ages getting mono sources e.g. Kick, Snare and Bass back into mono.
3. Export a Tempo Map
The last thing to include in each songs folder is a tempo map. This is essential for a number of processes in mixing but mainly for time dependent effects such as delay, which rely on the tempo/BPM of the song.
Yes some of this can be done manually but it is quicker to just give the engineer a tempo map. This is even more essential if the engineer is editing for you so that they have an appropriate grid to work with in their DAW.
An example of a Tempo Map in Pro Tools. Of course, this can be created in any DAW.
You can do this by exporting a MIDI file that is the length of the song. Most DAWs allow you to do this and this will give the engineer the tempo, meter and any change in those two.
You can also include in this any marker tracks that tell the engineer what sections are which e.g. Intro, Verse and Chorus.
It is a good idea to include any marker locations in the document I mentioned earlier. That way they can be manually entered if the MIDI file does not include them.
If you’re more comfortable with writing down the tempo map as a text file, that’s fine too!
4. Folder Organisation For Delivery
OK, so now all that is done it’s time to get everything organised.
Create a folder that has the title of the project on it and then within that, create a folder for each song and name it with the correct final title of each song (No working titles at this stage).
This is how you should be delivering your files to the mix engineer.
Number those folders so they appear in the track order that the project will be in. This allows your engineer to mix in order should they so wish and if the songs are being given to a mastering engineer (or if your mix engineer is mastering as well) it can be delivered back to you in the correct order for the project.
Then export your tracks into each songs folder, add your text document of information and tempo map for each song into each songs folder.
Then perhaps add another document detailing any additional notes for the project as a whole, reference tracks for the engineer to refer to and any other relevant information.
5. Delivery And Mix Revisions
OK so now that is all done, it is time to get it delivered to the engineer. Check before hand how they prefer to receive files.
Getting your stems to the mix engineer:
Is there a file transfer site they prefer (Dropbox or Wetransfer are two that I use) or are you expected to upload it to the engineers FTP server? Are they old school and want it delivered on a hard drive/ thumb drive?
Check beforehand and if you are not sure of how to do anything, ask!
Mix timeframe/setting realistic turnaround times:
Next establish the turnaround time for your mixes. How long will it be before your engineer will be giving you the first version of the mixed project for approval?
The last thing the engineer needs is a band chasing them for the mixes a day or two after getting the tracks for a full-length album. Mixes take time to get right so establish how long it will be ahead of time, this way you have it in writing and know when to expect your mixes back.
Mix revisions:
Also ask how many revisions are included in the cost you have been given. A mix revision is a chance to list any changes you would like made to the mix. The engineer will then perform those changes. Some engineers have a number of times they will do revisions then there will be an additional fee per revision following this.
Some engineers have unlimited revisions. Double-check this in advance. On the subject of mix revisions, check how your engineer wants these notes delivered. The way I do this is get the band to have a meeting and put all changes in to a single e-mail so I can refer to that as I perform the revision.
That way I don’t miss the Facebook message or text I got from one of the band members asking for a change or have to waste time compiling a list myself in order to perform the revisions and ensure everyone is happy with the final product.
Hopefully that has helped you get an idea of the steps required to submit your tracks to a professional for mixing. If you have any questions, please drop a comment below and happy tracking!
6. Loud Clicks/Pops on the Audio Recording
Make sure you close all other apps you don’t need for the recording process. Over-taxing your computer’s processor and RAM cause dropped samples that manifest as random clicks and pops.
Double check your settings to make sure the right sample rate and clock source are selected for your software, computer, and hardware
You’ll also want to verify that your hardware sample rate and bit depth settings match both your DAW software settings and computer system (Audio MIDI app on macOS, and Sound > Playback device > Properties > Advanced on Windows). If given the option, your audio interface should be set as the “master” for the sample rate or word clock.
Producing good audio recordings requires more than just the ability to push buttons, turn knobs, and click a mouse. Creating podcasts that are of broadcast quality requires a lot of tedious attention to detail at every step of the recording, editing, and mixing process.
What are your biggest problems that you have encountered? I’d love to hear them! Hit me up on Twitter or Instagram at @meonlylouder.
Written by Graham Waller
Related Articles